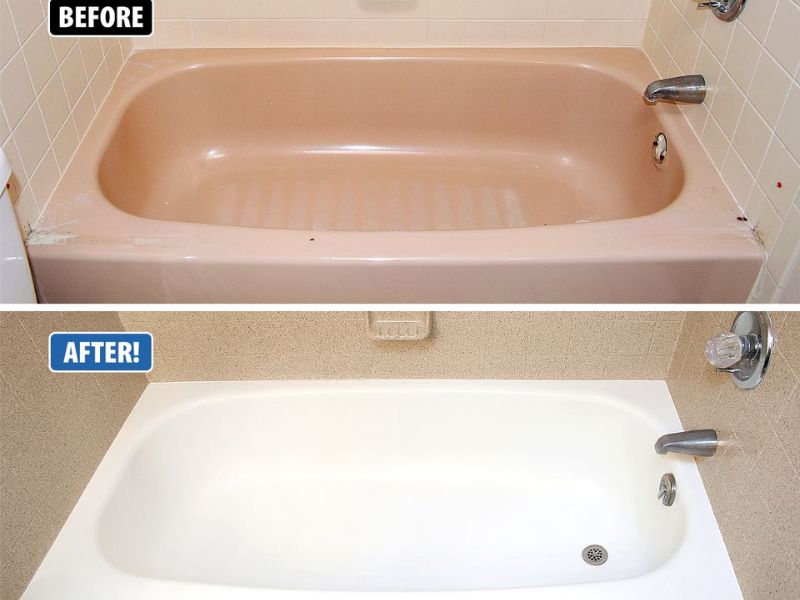
Your bathtub may look lovely and luxurious when newly built. However, after several years, it may change the color. Bathtubs may change the color due to tear and wear or dirt if left unused. Additionally, you might want to change the color of your bathtub from the old-fashioned pink/green to other modern colors.
You can repaint the bathtub (bathtub refinishing), use bathtub liners, or if you need a total change, you can replace it entirely. Bathtub reglazing doesn’t change whether your tub is made of acrylic, fiberglass or porcelain. When done, avoid harsh and abrasive cleaners to keep the color of the tub.
Regardless of the method, you will achieve a new look, and the color will create a new mood in your bathroom. This article guides you on the steps to follow while changing the color of your bathtub.
Why is the Color of Your Bathtub Important?
Colors denote different moods, and your bathtub color is no exception. The choice of your bathtub color will affect the feel, design, and mood of your entire bathroom. Here are the moods that different bathtub colors denote:
- White: A white color indicates high levels of hygiene and cleanliness in a bathroom. Since most people love clean bathrooms, they will opt for a white bathtub. If you used bath bombs in the shower, you’ll see the dirt faster with white bathtubs than other colors.
- Bright colors: Lavender, green, or blue colors are natural colors that signify a fresh and soothing environment. They are more relaxing than white or dark colors.
- Darker colors: Dark colors such as black amplify particular sections of your bathroom while hiding any blemishes. For instance, dark bathtubs amplify your bathroom’s aesthetics, and exterior decorations like tiles and lights leave the bathtub looking sleek and beautiful.
Whatever bathtub paint colors you decide on, it will have an effect on the overall look of your bathroom. As such, choose carefully.
Painting Your Bathtub (Bathtub Refinishing)
As previously mentioned, you can change the color of your bathtub in three different ways namely with or without a refinishing kit, and using bathtub liners. If you decide to repaint the tub, you must purchase a special paint with a waterproof solution. You can purchase a specialized bathtub paint or refinishing kit for this purpose.
Bathtub refinishing or reglazing involves using special compounds and primers that cover the existing bathtub color and replace it with a new color. While reglazing, you can match the color to match your preferences.
Using a Refinishing Kit
You can purchase a refinishing kit in your nearest store and repaint your bathtub. Bathtub paint refinishing kits have various items including:
- 8-16 ounces of refinishing paint
- Hardener
- Liquid primer
- Tack rag
- Rollers
- Etching cleaner
- Sandpaper
- Non-slip additive
- Rollers
- Tray
- Foam brush
Typically, it will take two days for you to refinish the bathtub and for the paint to dry. You should take about 4 hours to sand the bathtub surface to ensure it is clean for applying new paint.
Bathtub paint exhumes toxic fumes that can be hazardous to your health. Therefore, you should take precautions by wearing a mask and ensuring that the working area is well ventilated. Additionally, wear safety goggles to prevent paint from splashing into your eyes. Sand and clean the bathtub before painting so that the paint can adhere quickly.
To use the refinishing kit, follow these steps:
- Using a putty knife and sandpaper, remove the dirty residue and sand down the bathtub’s surface until it is entirely clean.
- Remove any hardware in the tub, e.g., bathtub faucet.
- Ensure the working area is properly ventilated by opening the windows.
- Dull the finish with water using etching powder to ensure that the new coating adheres properly.
- To further improve the bonding, sand the bathtub, rinse it, and leave it to dry. To ensure it’s completely dustless and with no residue, dry it using a dry tack cloth or paper towels.
- Apply the primer to the bathtub using a roller.
- Mix the epoxy coating, then use the roller to apply. On the cracks or edges, use a sponge brush to finish off.
- Apply the second coating. You can apply up to four layers.
- Once refinishing is over, keep the bathroom well-ventilated to allow the bathtub to cure for about 48 hours. If the refinisher you purchased requires buffing, buff it, then reinstall the bathtub hardware.
- Lastly, caulk your bathtub, leave it to cure overnight, and it’s now ready to be used. You may even use grout pens to change the color of the caulk lines as well.
If you can’t carry out these steps on your own, enlist the services of a professional. If the dirt from the refinishing procedure clogs the drain and the snake drain won’t go down the drain, you may also need an expert on the isue.
Painting Without Using Refinishing Kit
If you don’t want to use a refinishing kit, you can opt to repaint using bathtub-specific paints that come in numerous colors. The whole process takes between 36 to 48 hours, and you will need the following items:
- Painter tape
- Brush or roller
- Tarp/cover
- Hardening solution
- Bathroom specific paint
Keep the working area well ventilated and follow these steps:
- Use a limescale remover/cleanser to clean your bathtub thoroughly.
- Sand down the tub’s surface and leave it rough for better paint adherence. After sanding, rinse it, then dry it completely using microfiber clothing.
- Tape the bathtub edges and around the fixtures using the painter’s tape, then mix the paint with the hardener if need be. If your bathtub paint has a hardener, you won’t need to mix it.
- Use the roller or brush to apply the first coat, wait for 1-2 hours to dry, then apply the second one, ensuring that you leave no drips or streaks.
- Finish off using the epoxy thinner.
- After about 60 minutes, remove the tape and leave the bathtub dry for about 36 hours.
After you have refinished your bathtub and achieved a new stunning color, you need to give it the best aftercare. Always ensure the tub is clean to prevent dirt from sticking to the surface, making the paint dull. While cleaning, do not use an abrasive cleaner, scrubber, or sponge. Rather, use a clothing and gentle cleaner that won’t rub off your refinished bathtub.
Use Bathtub Liners
You can also opt to use bathtub liners since they are more affordable than bathtub refinishing. A bathtub liner is a sheet made from acrylic or PVC plastic that you can mold on your bathtub to give it a new color. You must use a special adhesive while applying it to ensure it locks in your bathtub.
However, using bathtub liners is expensive and may not give you perfect results since they may fail to fit perfectly. A bathtub liner may detach after using it for a while, thus forcing you to spend more money.
Replace the Bathtub
The last option for changing the bathtub color is replacing it entirely. Replacing the bathtub is more expensive than bathtub liners or refinishing. However, it may be your only option in some scenarios. For instance, if besides the bathtub color you also want to change its size or shape, you will have to purchase a new bathtub.
Consequently, major crevices and surface cracks that refinishing can’t fix will force you to buy a new unit. While purchasing the bathtub replacement, you can select the shape, size, design, and color you wish.
As you carry out any of the above procedures, ensure you take care of the whole bathroom as a whole since the cost of installing a new shower base, for example, is quite high if you damage it in the process.
Final Verdict
Change is inevitable! Your bathtub will require a color change after you’ve used it for several months or years. Whether you plan to change the color right away or in the future, this article will act as your guide. Use any of the methods in this article to give your bathtub a new refreshing color. If you’re not confident in your DIY skills, a professional is a call away.