It can be pretty hectic and time-consuming to figure out why your push-button toilet isn’t flushing correctly. The technique for repairing the issue is the same: the push button is put on the side of the cistern, the top, or the front.
The most common push-button toilet flush problems include a clogged toilet, low water levels, a warped toilet flapper, and locked inlet jets in the bowl. To fix it, unclog the toilet, increase the water level, adjust or replace the flapper, and unclog the inlet jets in the bowl.
Depending on the brand, resolving the push-button issue may be as simple as changing a small toilet element. While some of the causes for your toilet not flushing may be fixed quickly, others may necessitate the services of a qualified plumber.
What are push button toilets?
Push button toilets are toilets with buttons connecting the rods that activate the flush mechanism releasing water into the toilet bowl when pushed. For example, there are two push buttons on a dual flush toilet tank as it flushes varying volumes of water using two buttons.
Depending on the model, one flushes about 1.1 or 0.9 gpf (gallons per flush), while the other flushes at 1.6 or 1.1 gpf. This mechanism’s goal is to minimize the amount of water utilized to flush various forms of waste. The design is based on the fact that flushing liquid waste uses less water than flushing solid trash, unlike the traditional lever.
Push button toilet flush problems
Unlike the older toilet models which featured a lever-style flush handle, contemporary versions have a push-button to activate the flushing mechanism. With time and despite how hard you press the toilet flush button, it is typical for it to fail and stop flushing. It will seem looser than usual when the button malfunctions and no water drains from the toilet pan.
Below are some of the reasons (with quick fixes) for why your push button might not be working:
1. Clogged toilet
Attempting to flush anything apart from toilet paper down the toilet might result in clogs. As a result, it’s best to avoid using thick toilet paper. Only use septic-safe toilet paper as it dissolves in water fast thus preventing clogs.
Using too many sanitary napkins or toilet paper can potentially jam the pipe and make flushing hard. In addition, large wastes and random debris can clog your toilet pipes or even block your water flow.
These minor clogs accumulate and weaken or hinder a flush’s smooth flow, especially if the button has to strain more to activate the flush mechanism. This will result in you getting incomplete flushes or still having water run after a flush.
2. Low water levels
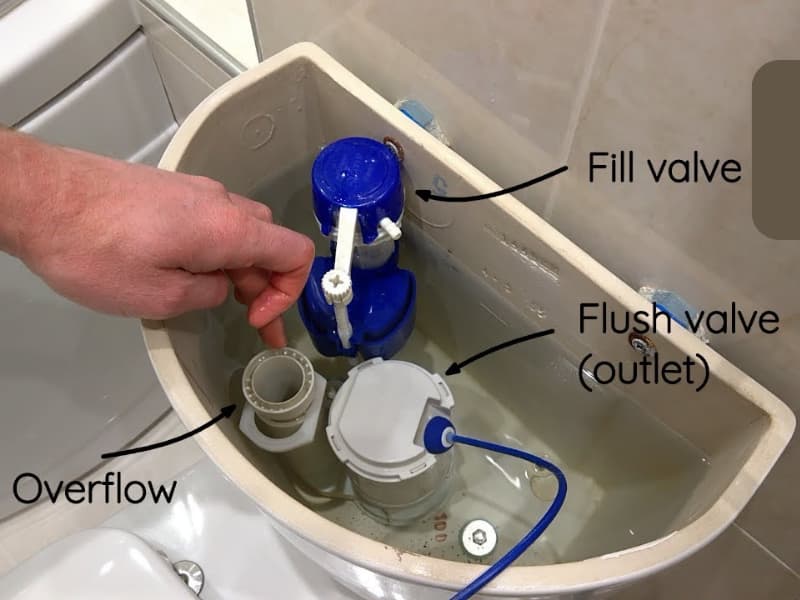
When the water levels are more than an inch below the top of the overflow tube, you will feel no resistance from the push button when you press it. Even though the pressure is perfect, the water level might be too low if the water valve is shut off.
As a result, it’s critical to keep the valves open and the water level at the proper level. Furthermore, if the water level in your toilet is too low, it will not be able to flush large wastes and still leave the toilet bowl clean.
3. Warped flapper
When the push-button is pushed, the rubber flapper that is supposed to discharge water may be twisted or distorted. When flushing, the flapper releases water and closes the water intake hole and the fill valve mechanism, ensuring that the toilet tank contains the correct amount of water.
It is located directly beneath the toilet lid and is an integral part of the toilet’s flushing operation. As a result, if the flapper seems deformed, damaged, or bent, it must be replaced.
4. Blocked inlet holes
When the intake holes get clogged, a lot of water that would have been utilized to flush the toilet is lost. If there is no water seeping from the toilet bowl’s side, holes are clogged. Another sign of a closed hole is water flowing straight down rather than diagonally.
Allowing water to run down the toilet bowl’s side for several hours can result in catastrophic water damage throughout the house and a significant increase in your power bill.
Fixes to push button toilet problems
The solutions to the problem above include the following:
1. Unclog the toilet
If the blockage isn’t severe, you should try to unclog the toilet line. Using a hooked metallic rod, remove debris clogging your toilet pipes. Next, plunge the toilet with a drain plunger for 10 to 20 seconds to fix the problem. Check whether the flushing has improved by pressing the push button when you’re finished.
The procedure can be done many times to determine the degree of obstruction. However, don’t dive too deep since this might cause further issues with your flushing system.
Unclogging the toilet manually can be difficult, primarily if the blockage is caused by product corrosion or too much debris caked on the piping walls. Consider shutting off the toilet’s water and filling the bowl with hot water if this is the case.
Allow a few minutes for the hot water to cool in the bowl before flushing it down the drain. The blockage is likely deeper in the pipes if it doesn’t work, and you need to hire a professional plumber.
2. Increase water levels in the tank
The toilet tank should have water above ” the correct tank level.” Some manufacturers even place a mark on the tank to help consumers figure out how much water is needed. If the toilet only flushes a little amount of water or doesn’t operate at all, verify that the water level in the tank is past the water level mark that is generally on the inside.
If you manually adjusted the water level, reset it to the manufacturer’s suggested setting. Also, replace any misaligned tank components that may prevent the water from adequately filling up the tank.
3. Adjust or replace the flapper
Check the flapper chain’s length to ensure it’s adequate and in excellent functioning order. Next, ensure the flapper shuts the opening when your toilet is not in flush mode.
You should also make sure there isn’t too much or too little slack in the chain. You’ll need to shorten the chain and reattach it to a closer hole to the push button. Finally, check the length of the chain on the flapper to make sure it fits.
It’s not difficult to replace the flapper-chain mechanism. To return your flapper, follow these steps:
- Remove the detached flapper and turn the water supply to the toilet.
- Ensure you flush the tank empty.
- Remove the flapper by unhooking the chain from the arm.
- If you’re unsure of the appropriate size and type, take photographs of the old flapper or bring it to the store while purchasing a new flapper.
Since various flappers are intended to perform differently, you should carefully follow the installation instructions when installing your new flappers. It should snag when correctly installed. Pour some water into your toilet’s tank to test if the flapper is working correctly.
Attach a lift chain to the flapper to give it some slack, so it isn’t excessively loose or tight. Then, before you turn on the water supply to your toilet, be sure the flapper is working correctly. You will require a plumber to replace a significantly damaged flapper in most cases.
4. Unclog the toilet bowl‘s jets
Examine the amount of obstruction under the toilet seat with a mirror. In addition, the condition of the inlet holes may be examined using a small mirror.
If the holes are clogged, follow these simple steps to unblock them:
- Bring a small amount of vinegar to boiling to about 129 degrees Fahrenheit.
- Pour it through the overflow pipe.
- Let the vinegar sit for at least 24 hours.
- Unblock and clean the inlet holes with a wire or an Allen wrench.
Mineral deposits or germs can clog the inlet pores in the tank, causing your toilet to stop flushing. Because these are persistent problems, it’s good to inspect and unclog any clogged holes regularly. In addition, consider installing a water softener if the perforations are blocked by mineral deposits from hard water, resulting in a light-colored coating on the walls.
Done right, these fixes can help you avoid a new toilet installation which can be costly at times.
Final thoughts
A simple plumbing repair can escalate into a costly project if you experience water damage to your home. To protect yourself, hire an experienced plumber who can get the job done right the first time. In addition, hiring a professional may help you utilize your insurance coverage and avoid unexpected expenses.