The correct sink drain height from the floor determines the height of the sink from the floor and, thus, the comfort of the users. Your rough-in sink drain depends on several factors, such as the sink drain’s size, the P-trap’s location, and the pipe connections.
Given that the standard sink is 8 inches deep, the standard rough-in height for a sink drain in the bathroom is 24 inches. This height can differ depending on the depth of the sink bowl and the height of the counter. In some cases, the sink drain can be just between 18 and 20 inches from the floor.
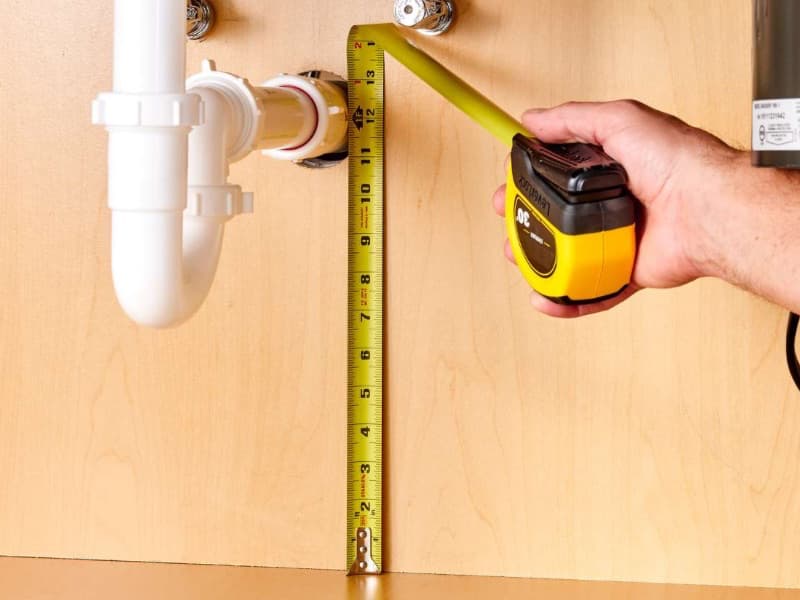
Knowing the rough-in height for your sink drain is essential since it helps you prevent common problems during installation. It also helps install related fixtures such as pipes and others.
What is the standard sink drain height from the floor?
The standard sink drain rough-in height is 18 to 20 inches from the floor. This distance is enough for your P-trap to have proper drainage. It also leaves enough room for both the hot and cold water lines to fit into place properly.
When taking measurements for your sink drain, leave about 20 inches of space below your drain. Otherwise, your P-trap will be attached to the floor.
A sink drain closer to the ground means the P-trap will also be closer to the floor. However, do not fret, as you can adjust both the height and depth of a sink drain during installation.
To avoid damage to the sink, ensure you use the correct plunger to unclog it and keep heavy weights off it among other care tips.
Factors that determine the sink drain rough-in height
Below are several factors that help determine the rough-in sink drain height:
1. Location of your P-trap
The average location of your P-trap significantly affects your sink water supply rough in height. According to the International Residential Code, the P-trap should be fixed at a maximum height of 20 inches beneath your sink. Your rough-in sink drain should be fixed at a height that allows the P-trap to be connected easily.
2. Sink drain size
Another crucial factor that helps determine the sink drain’s rough-in height is the size of the sink drain you want to be installed. You must ensure the sink drain is the right size for your space.
While most sink drains give an 8-inch depth, most people have different and diverse preferences regarding the shape and size of the sink to be installed.
Despite a bigger or more dramatic sink giving you more room for a wash, note that the size of the sink will always affect the height of your rough-in. Consider the sink size to ensure the sink drain is not installed too low or too high.
3. Height of your counter
The height of your counter is relative to the height of your sink since most people tend to have them aligned or have the sink as an extension. If you are using this system, then be sure that the counter leaves enough room for the sink drain to be installed without any issues.
4. Pipes connecting
Pipes connecting is another factor affecting the roughing in of your sink drain. Your rough-in should be able to stand and fully function without interfering with other pipes within the same area.
Some pipes, such as the hot and cold water pipes, are installed directly above the sink drain rough-in. Your drain should be installed in a manner that is not too low or too high to interfere with other installations.
How to install a sink drain (sink drain rough-in procedure)
A good hack for someone wanting to replace a standard sink with a deep basin sink is to lower the drain outlet in the wall to match the new sink drain height.
You need a tape measure, channel-type pliers, PVC tube cutter or hacksaw, marker, sink drain trap kit, sink drain, and strainer. Follow the steps below:
1. Consider the sink and counter height
To have the proper sink plumbing rough-in height, start by measuring the height of your counter and the depth of your sink. You then measure at least 12 inches below the base of your sink and mark this point to leave enough room for the P-trap, then find where to connect the drain to the sewer.
2. Install the sink drain pipe
Cut a 2-inch PVC pipe matching your measurements, then drill a hole into the studs and another on the floor beneath the sink. Feed the drain pipe through both holes while ensuring that you use at least a quarter of an inch per foot downslope for your water to drain correctly.
3. Connect the sink drain pipe
The next step is to use a sanitary tee to connect your sink drainpipe to the main sewer pipe, leaving the top port empty. Later, you will connect it to the vent, whereby you can use glue to prevent leaks and hold the plastic using cement.
4. Vent the drain
Your drain vent should be hooked on top of your sanitary tee connector since it helps to empty water faster while removing the sewer.
It will make the connection from there to the main vent stack. You should plan a route for your vent from the tee connector to the vent stack and drill holes accordingly in the studs to accommodate it. Use plastic cement to seal the joints when your vent is in place and connected on both ends.
The steps above are the most basic and have been simplified for an easy time when installing the sink through the wall. However, this isn’t the only method since you can also do it from the floor if you find it more manageable. They are equally as common as the others but are primarily used with pedestal sinks.
If you use silicone caulk, wait until it drys up before using the sink.
Do you have to center a sink drain?
It is not necessary to have your sink drain at the center of the sink. When one talks of a sink, most people tend to imagine one that is symmetrical with the drain located at the center (this is the centered drain). You can also have the drain a few inches to the left or right of the center.
The position of your sink drain significantly impacts your sink use, under-sink storage, faucet noise, and drain.
A centered sink drain is relatively easy to install, has less backsplash, gives off a classy look, is quieter, and, most importantly, fits most of the existing plumbing.
However, it also has its demerits, such as inconveniencing you when doing dishes and wasting space under the sink. Due to tight storage spaces, they aren’t the most suitable idea for a small kitchen.
Is my sink drain centered?
While it is not set in stone that your sink should be centered, it is pretty easy to determine whether or not it is. The first method is to check whether the drain on your sink is located in the center of your sink.
If the drain is located at the center, you have a centered drain. If it is positioned elsewhere, you have what is referred to as an offset drain.
The second method is to check the type of plumbing you have beneath the sink to see if the drainpipe is located at the center. You have a centered sink drain if your plumbing leaves you with little to no storage space. Below are the pros and cons of a centered and offset sink to give you more details on the most suitable choice for you.
Centered Sink Drains Pros
Some of the advantages of centered sink drains include the following:
| Centered Sink Drains Pros | Centered Sink Drains Cons |
| Easy installation and repair | Inconvenient |
| Quiet | Takes up more space |
| Aesthetically pleasing |
1. Easier installation and repairs
Centered drains are easier to install and repair since their drains aren’t pushed to the side and can also be easily installed with pre-existing plumbing. You can easily access the pipes to unclog them when they clog up, such as when you put coffee grounds in the sink.
2. Quiet
A centered sink drain is quieter and has less backsplash, especially if you have a high-powered faucet.
3. Aesthetically pleasing
While the location of your drain has no natural effect on your aesthetics, it makes your sink a more classy finish to your traditionally styled room or farm kitchen.
Cons
The disadvantages of centered sink drains include the following:
1. Inconvenient
When comparing dishes on an offset sink drain, stacking or doing dishes on a centered sink drain is cumbersome and limiting.
2. Takes up space
A centered sink drain is not ideal for someone with tight space as it takes up a lot of space below the sink.
Offset sink drains pros
The advantages of offset sink drains include the following:
| Offset sink drains pros | Offset sink drains cons |
| Can stack plates or other items | Hard to repair |
| Can double up | Slower draining than centered sinks |
| Provides more space |
1. Can stack plates
With an offset sink, you can place your plates in the sink and not have your drain covered. The drain location allows you to have dirty dishes stacked and still be able to do them.
2. Can double up
The primary function of a double sink is to group dishes. You can have an offset sink drain without needing the second sink.
3. More space
An offset sink gives you more storage space below your sink, which is a significant advantage, incredibly if you are tight on space. The drainpipe moved to the side leaves you with more storage space beneath your sink.
Cons
The disadvantages of having an offset sink drain are:
1. Hard to repair
When you need any repairs done to the drainage, it might be a bit hard with a new installation, even worse. This is because all repairs have to be done in tight spaces and corners due to all the plumbing being shifted to one side.
2. Slower draining
The offset drain has a slower draining system than the centered one since its faucet is placed far from the drain.
In conclusion, while both drains have their merits and demerits, it is always best to choose what works best for you with minimal setbacks. We hope the article has been of great help, and you now have an idea of the drain your want and how-to about the installation process.