A toilet fill valve has the role of regulating the amount of water in a toilet tank. It’s typically located inside the toilet tank, but some are attached to it from the top. Since a fill valve has to handle a certain amount of pressure and water flow, there can be cases where it will begin leaking or it won’t shut off when you flush.
A leaking toilet fill valve is caused by a loose lock nut, mineral deposits, a clogged valve or an old and damaged fill valve. To fix the leaking toilet fill valve, tighten the lock nut, clean and unclog it, or simply replace it. Toilets also leak due to faulty flappers, pipe leaks and condensation.
What makes a toilet fill valve leak?
Some of the causes of a leaking fill valve include the following:
Loose lock nut
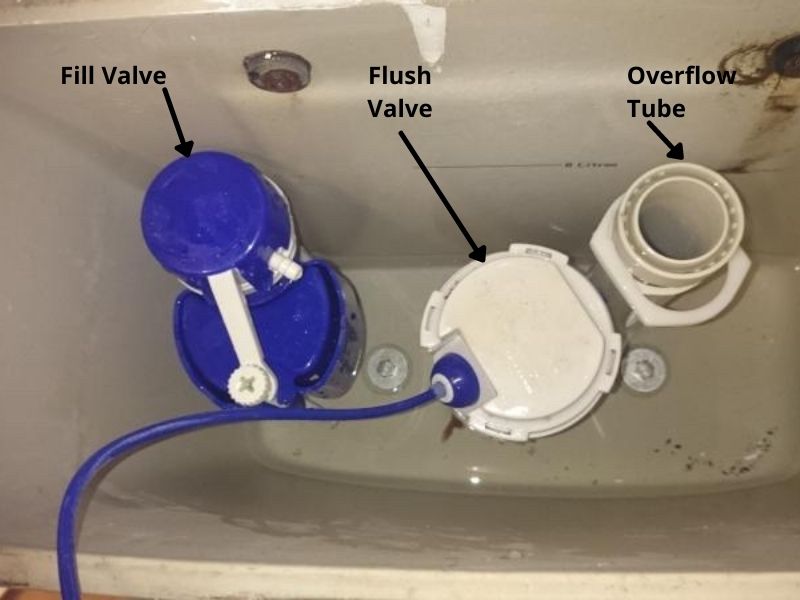
A loose lock nut is one of the most common causes of a leaking toilet fill valve. When the lock nut becomes loose, it can allow water to seep out from under it. If you notice that your toilet takes longer and longer to fill up and then finally stops filling, and water is constantly running into the overflow tube, then your fill valve may be leaking.
Loose threads on either end of the flush rod also indicate a loose lock nut problem. Both problems should be addressed immediately as they could lead to major flooding issues if not repaired immediately.
Mineral deposits
One cause of a toilet fill valve that won’t shut off is that water may leak from the fill valve itself. This happens due to mineral deposits which accumulate on internal parts after time, especially if your water supply contains high levels of calcium.
These minerals keep building up until they limit the seal, causing a leak. Luckily, this is usually an easy problem to fix by simply replacing the fill valve.
Old or damaged fill valve
If the fill valve is old or damaged, it will need to be replaced. Old parts can wear out or break over time, which causes them to malfunction. This is the most common cause of leaking toilet fill valves.
Fill valves are also susceptible to damage if they are dropped by accident when replacing other components under the tank. Toilet fill valve repairs are only temporary fixes since you’ll still need to replace it.
Clogged valve
Sometimes, debris builds up in the bottom of a tank that prevents water from flowing into it. A clog will prevent water from entering into the tank and pushing onto the toilet bowl rim where it needs to be for refilling after each flush.
When this happens, the pressure inside of the tank sends extra water bubbling over the top of the overflow pipe where it leaks down around the base of your toilet bowl or onto surrounding surfaces. Warning signs that the tank is clogged include water marks or pools around the base of your toilet bowl or running water sounds coming from the drain due to extra residual pressure keeping it open.
These are some of the most common toilet fill valves and, besides leaks, they can also cause other issues such as blockages, poor flushing due to low water amounts in the toilet tank and others.
How to fix a leaking toilet fill valve
The solutions to a leaking toilet fill valve include the following:
Tighten the loose lock nut
Shut off the water supply and tighten or replace the locknut that holds the armature in place with a wrench. Hold the part of the fill valve inside the tank when tightening the lock nut to get a tight finish. If the seal is worn out, replace it and add a rubber gasket both inside and outside the toilet tank.
If the lock nut can’t tighten the area around the water inlet into your toilet tank, replace it with a new lock nut. Since it may be made of plastic, be careful not to use too much pressure when handling the lock nut.
Clean the toilet fill valve
If the fill valve has mineral deposits, it’s possible that they may be the cause of a leak. Cleaning the toilet fill valve with vinegar and baking soda is an easy remedy for this problem. Toilet leaks caused by mineral deposits can often be repaired easily as well as cheaply as there is no need to replace parts or buy new water saving devices.
Clean the toilet fill valve as follows:
- Turn off the water supply so no more water enters the toilet then flush it.
- While you wait for the tank to empty completely, prepare a mixture of 1 part vinegar and 3 parts water in a spray bottle.
- Remove any old sealant from around where you’ll clean using a razor blade or sharp knife depending on how much needs to be removed. Clean this area with a clean cloth and the vinegar/water solution you prepared earlier.
- Using a cotton swab, apply the baking soda and water solution (with no vinegar) to any mineral deposits or stains on the outside of the toilet fill valve. This should be done gently so as not to damage any parts of the toilet fill valve.
- Let this sit for 15 minutes then rinse it away with water from another spray bottle or sponge.
- Clean out the access ports in your toilet fill valve if necessary. Clean inside these ports using brushes that were designed to clean them such as toothbrushes and Q-tips depending on what’s available.
- Clean the valves under your tank cover (if necessary) using a similar technique to remove mineral deposits and/or stains. Clean the inside of these valves using a cotton swab dipped in a vinegar and water solution (1:3 parts).
- Rinse and refit the fill valve back into the tank.
There are several things you can do to avoid experiencing these problems again, such as using only high-quality parts made of durable materials which are resistant to mineral deposits. There are also a few preventative measures you can take including regularly cleaning the area around your toilet’s fill valve and flapper to remove any dirt or debris that may collect there.
In addition, changing out your water supply from a well or source containing lots of minerals will help reduce these problems in the future. Clean the toilet tank should be done at least once a year to prevent clogs.
Unclog the fill valve
Unclog the toilet fill valve as follows:
- Turn off the water at the shutoff valve. Replace the shutoff valve if it’s faulty for this to work.
- Grab a pair of channel locks, set the jaws to slip over the plastic pipe and then turn the inlet pipe counterclockwise to remove it. Unscrew all three pieces of the valve assembly (the ballcock, float cup and plunger) from the fill pipe. Unhook the hose from the overflow tube at this time as well.
- Remove all debris from inside of the fill valve with a wire hanger by forcing it through each piece using a hammer or mallet to push it out if necessary. Be sure to remove any sediment that has settled in the bottom of the fill valve body.
- Rinse everything off after you have finished removing debris.
- Reassemble and reinstall the fill valve into your toilet tank. Make sure that everything is tightened properly.
- Adjust the float cup to find the correct water level in the toilet tank.
If there is a leak after that, unscrew everything from the fill valve again when you are done, then place a piece of shrink tube over the threaded end of the plunger rod, slide on a rubber washer, then screw on another washer followed by an end cap. Use plumber’s tape to secure all connections over the threads holding each part together. This method should be done each time you clean the shower stall to avoid clogs rendering you toilet unusable.
Replace the toilet fill valve
If you’ve determined that an old fill valve is the problem, simply remove the old one and replace it with a new part. Old valves can be identified by their age as well as any obvious signs of wear and tear such as cracks or leaks.
Old fill valves may also have calcium deposits around them caused by hard water build up over time. This requires removal using vinegar and abrasive scrubbing to get rid of them before installing a new fill valve. To remove and replace an old fill valve, follow these steps:
- Turn the water supply to the toilet off by closing the shutoff valve behind your toilet tank or beneath it if there is no shutoff there. You’ll find this near the wall on which your toilet is mounted if it’s not immediately visible on top of it.
- Flush your toilet and hold its handle down until all of its water drains out into the bowl. This will empty any excess water within your tank that could damage components inside it when you disconnect them for replacement with new parts.
- Unscrew the flush valve. Its tube connects to the fill valve inside of it that opens and allows water to flow into it when you press your toilet’s handle. Disconnect these parts by pulling them apart with steady pressure on each hand if they’re stuck together or twisting them counterclockwise if the flush valve is the threaded one mounted on top of the fill valve.
- Unscrew and remove the fill valve from the toilet tank after disconnecting its supply tube from any fixtures where it may be attached underneath it using an adjustable wrench. If these tubes are old, brittle, or damaged in some way, consider replacing them as well as filling valves before reassembling your toilet. You can find replacement parts at hardware stores or home improvement centers that have plumbing sections for this purpose.
- Insert the new fill valve into place by twisting it back onto its threaded flush valve tube until it’s tight and won’t budge any further. If your toilet flushes poorly after correcting a leaky flapper, another problem may exist within your tank that needs to be resolved first before any leaks are repaired. Ensure the overflow pipe is only as high as the critical level mark on the new filter valve. Cut it shorter if it’s above this level.
- Reconnect your fill valve to its supply tube on either side of it using an adjustable wrench. Do this then turn your water supply back on again behind the toilet tank or beneath it if there is no shutoff located there. Reconnect the other parts of the flushing system such as the fill tube which is inserted into the open end of the overflow pipe and the flapper chain.
- Adjust the fill valve so that the water is about 1/2 an inch from the top of the toilet tank when full.
- Turn on the sink closest to the toilet and make sure there is no dripping from any of other your fixtures before flushing the toilet to test its improvement.
If you’ve decided instead that a bad or damaged fill valve is to blame for a leaky toilet, changing it will solve the problem in most cases. Old fill valves may also have calcium deposits around them caused by hard water build up over time which requires removal using vinegar and abrasive scrubbing if they’re present before installing a new fill valve.
When replacing your toilet fill valve, be sure to use only high-quality parts made of durable materials like brass and ceramic. These will resist mineral deposition better than other materials such as plastic or rubber which can get damaged very easily.
Also, look for a fill valve made of the same material as your fill valve (usually brass) since these tend to work best together. An easy way to determine what kind of parts you need is to take a look at the color of yours now in comparison with what is available in local hardware stores- they should be the exact same. If they aren’t, chances are they won’t work well with each other when put back on your toilet.
Toilet fill valve types
Knowing the main types of toilet fill valves helps make the fixes suggested above much easier since you know what to do with the type of valve you have. The good news is that the installation process is the same for all fill valves.
The main toilet fill valves are as follows:
Ball cock fill valve
The ball cock fill valve is the most common type of fill valve found in homes. Ball cock valves have a small float ball that floats on top of the water inside the tank. This is attached to a lever arm or handle which opens and closes the flow of water into the tank when adjusted.
Ball cock valves are also known for being noisy due to their design having small parts that can become loose over time. Their main advantage is that they are inexpensive compared to other types of fill valves.
Piston fill valve
Piston fill valves are not often found in homes but are more common in commercial applications where many people use them. These work very similarly to ball cock fill valves but instead use pistons to move up and down in order to control how much water enters the tank.
A major advantage of pistons is that they have less parts than ball cock valves, making it easier to fix them when needed.
Float cup fill valve
Float cup valves are also common in commercial settings and provide a simple way to adjust the water level inside your tank. These involve a cup-shaped float assembly which allows you to adjust how high or low the water level will be at the same time as filling up the tank during a flush cycle.
Float cups can easily become corroded over time which can lead to leaking or not filling up all of your tank’s water supply.
The choice of fill valve is up to you and the design of your toilet. Fluidmaster toilet fill valves, one of the most popular, come in all the three types mentioned here.