The bolts on the toilet tank can get rusty due to constant exposure to moisture. When you try to remove them with a spanner, they won’t budge since they lack grip. Annoying, right?
In such a case, you can remove rusted toilet tank bolts with a screwdriver or a hacksaw to cut them off. You can also use penetrating oil to loosen the bolts before unscrewing them. Avoid this problem by using brass bolts that won’t rust even in moist conditions.
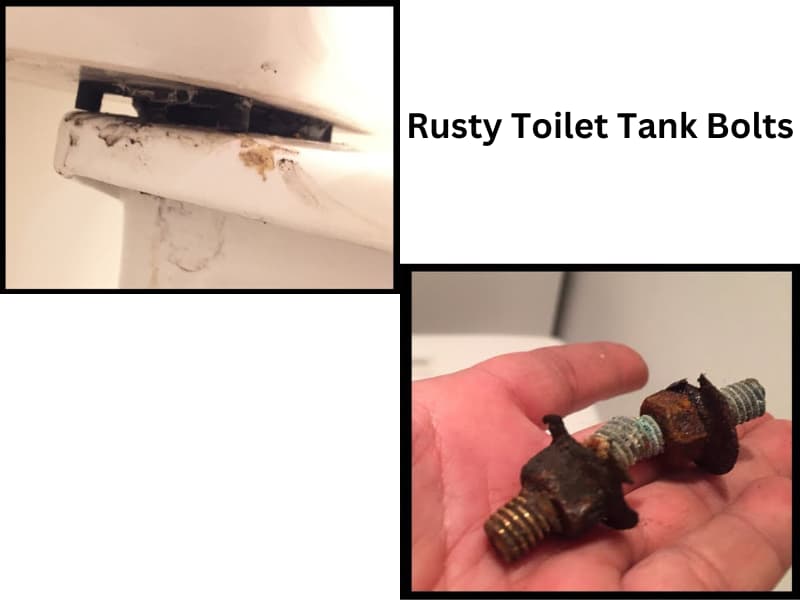
Why do toilet tank bolts rust?
Toilet tank bolts are in contact with water since the bolt heads are always submerged at the bottom of the toilet tank. Steel bolts in contact with water will eventually erode.
Furthermore, corroded toilet tank bolts are caused by leaking water, bathroom moisture from a neighboring shower, and other issues. Bolt heads, and the nut and threaded section that extends outside the toilet tank are also susceptible to rust.
How to remove rusted toilet tank bolts
The fill valve, the pipe leading to the toilet bowl, and the toilet tank are all sealed together by tank bolts. On most toilets, the bottom of the tank is secured by two bolts on either side.
Rusted bolts can be removed in 7 simple steps as followed:
1. Shut off the water supply line
The shut-off valve must be closed to stop water from entering the tank. To shut off the water supply pipe, turn the handle clockwise. Use a pair of pliers if you can’t do it by hand.
Step 2: Flush the toilet to drain the toilet tank
Flush the toilet so the rusty bolts are dry and accessible. Now that the tank cover has been removed, you can see the bolts on the toilet tank’s base.
Step 3: Using towels or sponges, remove any remaining water
There may be some water in the toilet tank even after flushing. If so, use a towel or sponge to clean it. Being made of plastic, the tank’s bottom should be simple to clean, and you can quickly remove any debris.
This also makes it simple for you to get close to rusty bolts.
Step 4: Use penetrating oil to loosen the bolts and nuts
Rust makes it challenging to detach metal components when it accumulates on bolts and nuts. The hardest chunks of rust can be removed with a penetrating oil like CRC Screwloose.
Apply the oil to the rusty bolts and nuts on the toilet tank. After that, wait 10 minutes for the oil to corrode the rust. The oil contains a lot of lubricants, which degrade metal surfaces and lessen friction.
Typically, one application is sufficient to make the bolts turn freely.
Step 5: Unscrew the bolts
With a flathead screwdriver and a set of pliers, you can undo the bolts after they become more pliable. Use the flathead screwdriver and hold the pliers tightly to secure the nut. Directly press a screwdriver into the bolt head.
To remove the bolt, turn it in the opposite direction. Unscrewing the bolts should be simple with penetrating oil.
Step 6: Cut the bolts
No matter how much penetrating oil you use, some bolts are impossible to unscrew. The tank’s bottom is covered with toilet bolts that are hanging downward. Your task is to insert the cutting tool between the nut and the tank in a horizontal position.
You must continuously move the saw back and forth to cut and remove rusty fasteners. The rusted bolt will start to split right away, but it might take you a minute or two to cut it completely.
When cutting bolts, use extreme caution because you are using potentially harmful equipment.
Step 7: Install fresh bolts
A rusty tank bolt needs to be taken out and replaced. The package includes new bolts for the toilet tank and nuts to hold the bolts in place.
To make way for new sets of bolts and nuts, first, clean the holes that were left after cutting. With your fingers, you can put the bolt in the threaded nut.
Place the pair on the tank after that, aligning the holes with it. The replacement set should be firmly installed using a flat screwdriver. You can also use a pair of pliers or adjustable wrenches to grip the nut.
Since toilet tanks are plastic, avoid tightening the bolts too much. You risk shattering the tank if you tighten the nuts too much.
How to stop toilet tank bolts from rusting
Tank bolts frequently acquire rust because they are constantly submerged in water or in contact with moisture. Bolts are also damaged by condensation. It leaves a layer of chemical residue on metal surfaces that can cause corrosion.
1. Use brass bolts and nuts
The proper hardware must be purchased to stop tank bolts from rusting. Unfortunately, many nuts and bolts are not resistant to corrosion. Brass is the best option because it can fend off rust and corrosion.
In addition, there won’t be any corrosion left behind because brass bolts are likewise compatible with moist air and water. Brass is also lighter than steel and will thus contribute less to the weight of the toilet when you want to lift it.
2. Remove rusty bolts
Tank bolts that have rusted need to be removed as soon as feasible. Long-term neglect of rust can damage the tank of your toilet. The integrity of your toilet tank depends on the toilet tank bolts.
They maintain the tank’s integrity, but rusty streaks harm the bolts and create fissures. As a result, the tank may soon begin to leak water.
Additionally, corroding bolts inside the toilet tank cause interior damage. The toilet flapper chain can also rust and become dysfunctional.
Conclusion
When the bolts on your toilet tank get rusty, replacing them is your only option. You can use a pair of pliers or a screwdriver with penetrating oil.
If that doesn’t work, simply cut off the nut and bolt, then replace them with new ones. Avoid rusty bolts by using brass bolts which won’t rust even when in contact with water.