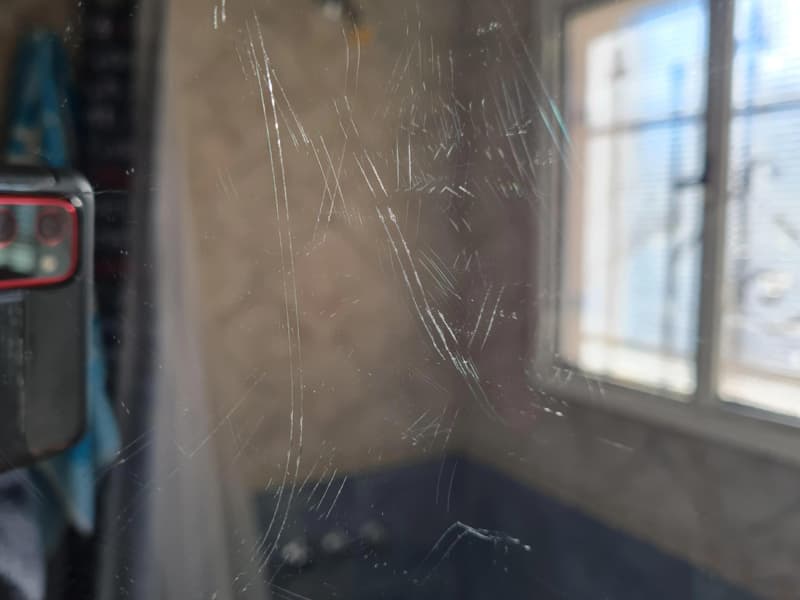
Having a scratch on your mirror can be disheartening. We all love our mirrors to look flawless and crisp. In most cases, you can fix it or simply go for a new one.
Having scratched my bathroom mirror while shaving my beard, I decided to find ways of fixing it since it was fixed on the wall and would have cost a fortune to replace it.
You can fix a mirror scratch using toothpaste, baking soda, nail polish, metal polish, liquid pumice stone, mustard and vinegar paste, and commercial scratch repair kits.
Consider keeping the mirrors away from areas where they can be bumped. I moved my full-body bathroom mirror further from the trash bin and a little higher off the ground and have had fewer accidents with it.
How to repair a scratched mirror at home
Before trying out the fixes below, keep the following precautions in mind:
- Test the method on a small, inconspicuous area of the mirror first to be sure it doesn’t damage the mirror further.
- Don’t use abrasive materials or clothes, as they’ll damage the mirror further.
- Use gentle pressure in circular motions when applying cleaners to the mirror. You should keep this routine even when cleaning the mirror.
- Consult a professional if the scratch is deep.
Some of the items and methods you can use to repair your scratched mirror include the following:
1. Toothpaste
Use non-gel toothpaste (not abrasive or whitening) and a soft, damp cloth for this method. Apply a small amount of toothpaste to the damp cloth, then gently rub it into the scratch with circular motions.
After smoothing away the scratch, rinse the mirror with clean water and a dry, soft cloth. If the scratch hasn’t gone away, repeat the process until you’re satisfied.
Don’t overdo it since I found out that seemingly shallow scratches on a mirror can be quite deep, and more work doesn’t always eliminate them.
2. Baking soda
Make a paste of baking soda with water. Ensure it’s a smooth and soft paste to avoid scratching the mirror, then apply it to the mirror with a soft, damp cloth in circular motions.
After that, rinse with clean water, then wipe the mirror dry. I use microfiber clothing for such cases to avoid damaging the mirror any further.
I always have a can of baking soda in my home since it’s one of the most used DIY substances. I’ve used it severally on my large bathroom mirror with commedanble results.
3. Nail polish
This method is suited to very shallow scratches as nail polish doesn’t go deep below the surface, even with microfiber clothing. Also, choose a clear nail polish meant for acrylic or glass surfaces.
Simply apply a thin layer of nail polish over the scratch, then let it dry completely. Buff it away with a clean piece of microfiber clothing.
4. Metal polish
The best metal polish to use is from brands like Silvo and Brasso. Apply some metal polish to a soft cloth, then gently rub it on the scratched area in circular motions. Wipe off any excess polish from the mirror.
Clean the mirror with a damp piece of soft cloth, then dry it with a dry piece of cloth. Repeat if necessary.
5. Commercial glass scratch repair kit
As I have found out, each commercial glass scratch repair kit comes with its own instructions. However, most of them include applying a solution to a piece of microfiber clothing, applying over the scratch in circular motions, and cleaning it off afterward.
One such ingredient is cerium oxide which is a jewelry-polishing compound. Simply mix it with water, then apply it to the mirror to restore its shine.
6. Mustard and vinegar paste
Combine mustard with white vinegar to make a paste. Use a damp microfiber cloth to apply the paste to the mirror in circular motions to remove the scratch. Clean and dry the mirror afterward.
These methods also work with other mirrors beyond the one in your bathroom. I’ve used most of them on my car rearview mirror and others with excellent results.
7. Liquid pumice soap
Liquid pumice soap is a heavy-duty hand cleaner with abrasive elements that can be useful in removing scratches from your mirror. Be careful since you could easily damage the mirror if you use too much force when removing the scratches.
Put a microfiber cloth in liquid pumice soap, then gently rub the mirror in circular motions over the scratch. Clean it off, then wipe it dry.
How to remove deep scratches from a mirror
When the DIY methods above don’t work, it’s time to call in an expert. In most cases, the expert will tell you right away if the mirror is repairable or if you need to replace it altogether.
Mirrors located at the top of a vanity are safer than those close to the users. In such a case, there will be less accidents leading to scratches and cracks.
How to fix a scratched mirror back
Some scratches on your mirror might be at the back, not the front. A reflective coating at the back of the mirror allows you to see your reflection. This layer can get chipped, scratched, or de-silver from old age or poor manufacturing. You will see small spots and scruffs appear on your mirror.
You can fix this issue in the following ways:
1. Hobby paint pen
Hobby paint pens are easily available in stores and are one of the best remedies to repair a scratched mirror back. Buy one that has a chrome mirror paint for this exercise.
- Remove the mirror from its frame, then place it face down on a stable surface such as a table.
- Clean, then dry the area around the scratch.
- Shake the pen before using it to color the scratch.
- Let it dry for about half an hour, add another layer of paint, then check if it has worked.
If you’re satisfied, put the mirror back into its frame, then hang it up.
2. Aluminum foil
Aluminum foil is cheap and easily available. However, the results will not be as good as a new mirror or other remedies. You will need aluminum foil and Scotch tape for this exercise.
- Take the mirror from the wall, then remove it from its frame.
- Put it on a stable surface with the face down, then cut enough aluminum foil to cover all scratches or the entire back of the mirror.
- Place the aluminum foil on the mirror’s back with the reflective side facing the mirror, then tape it over the scratches.
- Remove any wrinkles or bubbles from the foil using a flat item like a spatula.
- Put the mirror back and enjoy it.
3. Re-silvering kit
Resilvering kits are the best when it comes to repairing the back of your mirror. However, they’re very costly (up to $150 or more) and have toxins that may not be safe for some users. If your mirror is such a good value (more than the kit) and you are careful enough not to ingest the toxins, this is the best fix.
- After wearing protective gear, use the paint stripper in the kit to remove the protective coat on the back of the mirror.
- Use the nitric acid in the kit to remove the silver coating at the back of your mirror, then clean it with a clean cloth and deionized water. Let it dry.
- Mix the coating chemicals as directed in the instructions manual, then spray the solution on the mirror and let it dry.
- After that, apply copper paint over the silver coating, then let it dry as well.
- Finish the procedure with a layer of backing paint on the back of the mirror, then put it back in its frame and the wall.
I used this method on a small handheld mirror, and the results were excellent. You wouldn’t tell it from a new mirror from the store. If you have a mirror behind a good bathroom vanity, it will take some effort on your part to remove it and re-silver it.
Summary
You can fix scratches on your mirror, whether they’re at the front or the back of the mirror, with simple methods. However, some scratches are so deep that you may need to call an expert to fix them, or you can simply buy a new mirror.