When building or renovating your bathroom you have to install a curb or rim at the bottom of the bathroom to catch any excess water. A good shower curb helps keep water contained in the shower and prevents your bathroom floor from soaking. Installing a good shower curb is necessary especially if walking into a dump bathroom or have water still pooling irritates you.
The recommended minimum width of a shower curb is 36 inches although some shower curbs can be 42 or 48 inches wide. The standard height of a shower curb is 2 inches above the top of the drain. The shower curb contains the water spray from your shower so that it doesn’t splash to the floor outside.
One of the biggest issues of installing a shower curb is doing it while your floors are undergoing renovations as the mortar doesn’t always stick to the tile wall. The right mortar for the shower curb and pan will prevent leaks and other structural issues.
Shower curb’s height and width
The standard height of a shower curb is 2 inches above the top of the drain. This does not mean it must be 2 inches. It simply means that you should have 2 inches of a drop from where the drain is located to where you step in.
The height of your shower curb is dependent on your floor type as a slanting floor can have a shorter shower curb as compared to the standard level floor.
The width of a shower curb is 36 inches up to 48 inches depending on the size of the shower.
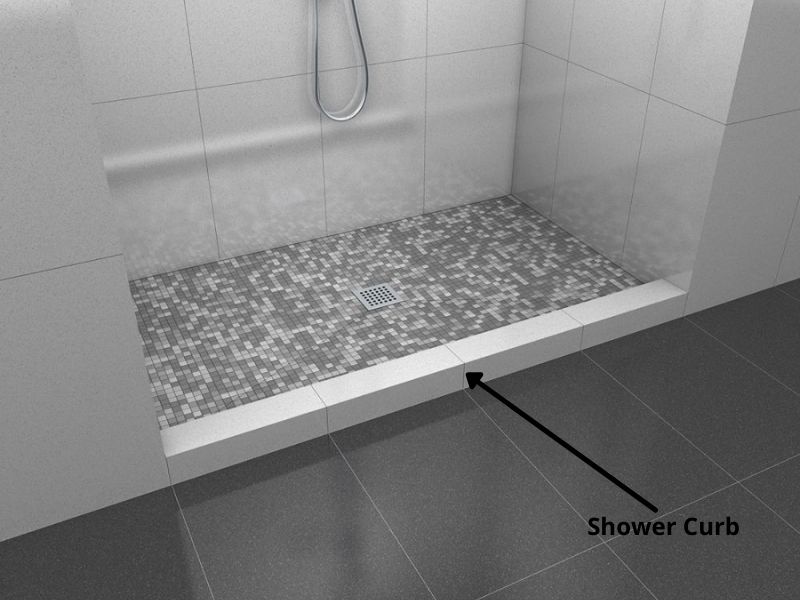
Shower curb dimensions
A shower receptor that has a finished curb threshold shouldn’t be less than 1 below the sides and back of the receptor. The curb shouldn’t be less than 2 inches and not more than 9 inches deep when measured from the top to the curb.
Your shower curb should at least be 2 inches above the drain if your bathroom floor slope is ¼ an inch per foot. In this case, the height of the curb from a distance of 3 feet is 1¼” from the shower floor.
| Shower Curb Dimensions | Size in inches |
| Shower curb width | 36 – 48 inches |
| Shower curb height | 2 inches |
| Shower curb overhang width | ½ inch |
| Schluter curb size | 38 x 6 x 4½ or 48 x 6 x 4½ or 60 x 6 x 4½ |
Shower curb overhang size
The shower curb overhang should be at least ½ an inch wide to act as a solid barrier against excess water or a flooded shower. The shower curb overhang is the distance between the inside of the shower and the outside.
The most common design is the 90-degree turn along the edge although there being a variety of overhangs. The overhang distance should be reasonable as wider overhangs reduce the ease of access and increase more chances of you tripping and falling.
Schluter curb size
The Schluter curb is available 38″ x 6″ x 4½” (97 x 15 x 11.5 cm), 48″ x 6″ x 4½” (122 x 15 x 11.5 cm) and 60” x 6” x 4½” (152 cm x 15 cm x 11.5 cm). It’s a pre-fabricated shower curb made for use in conjunction with your shower system. It comes already waterproofed for the tile leaving only the sealing joints. It is pretty simple to install as all you have to do is:
- Apply a thin set of mortar to the floor and edge of the shower base and walls using a trowel.
- Press it firmly into place and check the underside to ensure maximum support and coverage.
- Seal the curb to the base and wall using waterproofing strips and preformed corners.
The Schluter’s curb is one of the best when it comes to waterproofing and managing water vapor in a shower.
What is a shower curb?
A shower curb is the border between the base pan and bathroom floor used to keep water contained in the shower area to prevent it from leaking to the floor. It is also referred to as a shower threshold or dam. They can be built or bought and are usually made of wood or concrete but can also be made out of rubber.
They act as the first form of defense against water damage and should be made and build according to building regulations for best results. Cleaning a shower curb is easy and it should be cleaned each time you clean the shower stall.
Purpose of a shower curb
The main purpose of a shower curb is to help keep water limited to the shower area only and can also act as a foundation for mounting brackets for a shower door. The shower curb also acts as a failsafe when your drains get clogged and keep back the water.
Although the standard height is 2 inches depending on your floor if slanted, the slope can help cover some or the distance from the top of the curb to the drain.
Narrow Shower Curb
This is essentially the same type as the normal type of the shower curb but has been made shorter with smaller blocks such as the 2 by 3 inches. Below are some of its pros and cons:
Pros
- Safe to use for all age groups as it reduces the chances of you tripping and getting hurt as you use the shower.
- It makes the bathroom look more spacious as narrow shower curbs don’t take as much space.
- Easy to clean as it does not cover a large surface area and you can clean without bruising your elbows.
- Offers privacy as you have a surface to mount your shower curtain or door on.
Cons
- It has surface joints which if not cleaned properly leave room for mildew and grime to collect.
- Water can still get everywhere as the threshold isn’t as wide.
- You may have to frequently clean a lot of extra water.
Still, the narrow shower curb is one of the best when it comes to keeping water within the shower stall.
How to build a shower curb
There are different methods of building a shower curb but the one below has been proven to be the most durable over time. Following the steps below will leave you with a great custom-made shower curb that not only looks great but also helps prevent water from leaking into your floors.
You need cement mortars, a level, a flat trowel, hammer, nails and screws, grout (optional), tiles and tile spacers, wall anchors (optional), and a pan liner. Assemble all the materials needed inclusive of the cement mortar mix, concrete blocks, and sand mixed with water according to the package instruction manual.
- The first step is having the dimensions of your shower to determine how much material you need. Your left side should be inclusive of at least an inch leftover for overlapping joints between two-row tiles. Put into consideration the flexibility of materials while making purchases in order to leave a little wiggle room as there might be more extra waste from broken pieces.
- Stack 2 blocks of cement on top of each other ensuring they are cut right to fit into your shower entrance, and then screw them securely. Always use non-corrosive screws when working with areas that are in constant contact with water.
- Cover the entire curb with a waterproof pan liner that extends to the floor and up the walls for about 7 to 8 inches taking care not to puncture it.
- Unscrew and remove the top part of the drain flange and lay the pan liner and then put it back in place replacing the screws and bolts.
- Cut out the liner around the drain in a circular form, the hole should reach the bolt at the bottom of the drain flange.
- You then unscrew the bolts applying a ring of silicone under the liner to the bottom of the drain flange, be sure to avoid getting any silicone on the bolt holes.
- Press the pan liner against the ring of silicone and screw in the top of the drain flange gently to prevent any cracking.
- Set the liner evenly into the corners, sides, and up the walls while securing it with tape. Then at two opposite corners from the curb, fold the liner over itself.
- Cut the liner vertically from the edges of the curb where it meets the wall and lay the liner flap over it making sure to cover it completely.
- Cover the curb with metal lath and tape over the edges to prevent the liner from puncturing.
- Add a layer of mortar or cement of about an inch thick and place a straightedge on top and press it down to create suction. Apply another ½ inch thick layer of mortar to the outside of the curb while the straight edge is still on, getting rid of any excess mortar with a flat trowel.
- Once you are done with the inside mudding take a 1-hour break to allow the mortar to harden. Using a flat trowel, go over the curb again to ensure it matches your door height and check whether the inside and outside of the curb are parallel.
- You now tile the rest of the shower starting from the sides and then finish with the top of the curb.
Give it time to dry up (at least a day) then use the shower as desired. Use the same procedure to fix a shower curb when it’s damaged or has grown old. Keep an eye on the shower pan which may also need to be replaced or installed a fresh if there’s an issue.
How to waterproof a shower curb
There are different ways of how to waterproof a shower floor. In the past, most contractors used rubber or copper shower pan liners installed before the mortar base. This method allowed water to seep through and collect on the pan liner to protect the floor beneath but has the potential risk of shifting. It then leads to the inevitable damage of the floor or the growth of mold.
Today, with the new waterproof membrane technology, most contractors have shifted. They are placed directly beneath the tile layer to avoid any penetration into the cement or mortar. There are four commonly used types:
Sheet membranes
These are manufactured from a variety of different blends of plastic compounds attached directly to the tile backer board and shower surface. Most sheet membranes use “peel and stick” technology for easy installation.
Liquid membranes
This is essentially waterproof paint for your shower, applied using a simple paint roller. Once it dries, the membrane becomes an elastomeric layer that stays flexible.
Foam wallboards
They are installed as tile backers that offer structural stability as they are made from polystyrene foam and also provide a waterproof membrane.
Foam shower base
These are often sold as kits that come with the foam shower curb, waterproofed the same way as the base. It may also include a membrane bonding shower and seam tape.